Color Revamp Color Swatch

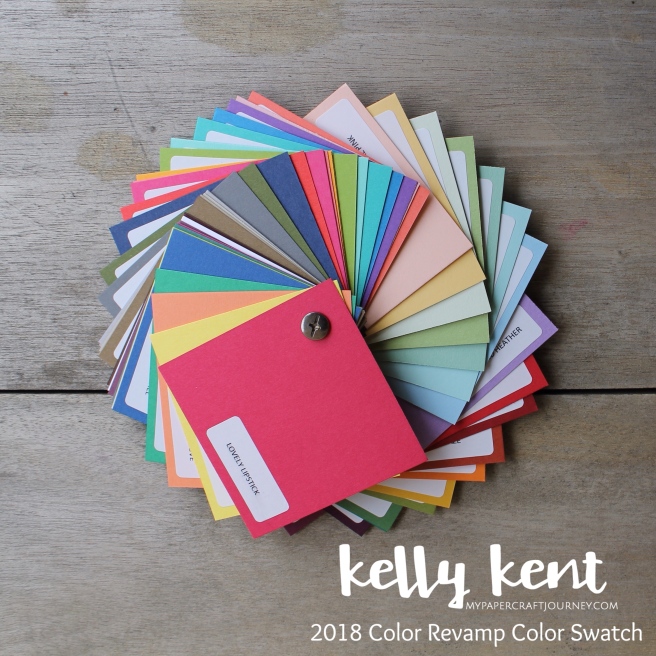
As part of the gifts we received at OnStage, those that attended the CentreStage leadership dinner got to take home a beautiful Color Swatch.  It featured all 53 colours from the 2018 Color Revamp – complete with labels.

I have already made & gifted my own version of this great idea to my Paper Adventures team members, and now I’m offering them to you.

2018 Stampin' Up! Color Revamp Color Swatch - Buy Now | kelly kent

There’s 3 easy ways for Australian residents* to get their hands on this useful colour wheel which will become part of your main crafting toolkit….

  1. Join my Paper Adventures Team and receive a Color Swatch as a welcome gift (click here to find out more about joining Stampin’ Up!).
  2. Place an order from 1st June – 16th June 2018 in my online store of $100+ (before shipping) using the host code: 6TTS2UDN.  Click here to shop online.
  3. Purchase via the PayPal payment link below for the low price of $14.75.  That’s the same as a pack of cardstock – only you’ll get all 53 colours, labeled & bound with an elegant Chicago Screw fastener.  Not local?  Choose tracked delivery option at $23.25 to have your Color Swatch delivered Australia wide.  Delivery starts 1st June 2018.

*Due to Stampin’ Up! policy I am unable to sell these outside of Australia.

2018 Stampin' Up! Color Revamp Color Swatch - Buy Now | kelly kent

They measure 7cm x 7cm and feature the colours from the 2017-2019 In Colors, 2018-2020 In Colors, Neutrals Collection, Brights Collection, Subtles Collection, Regals Collection and 3 Basics – all 53 colours available as part of the 2018 Stampin’ Up! Color Revamp.

2018 Stampin' Up! Color Revamp Color Swatch - Buy Now | kelly kent

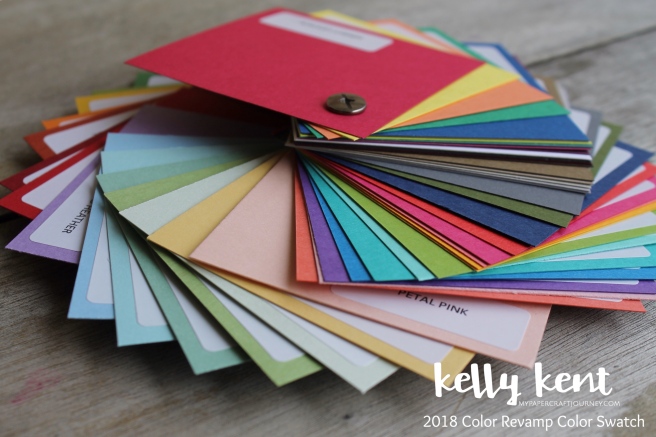
My team are loving having these on their craft desks so they can check colours, compare colours, match colours, create colour combinations and work on which colours to next add to their wishlist.

They will boost your creativity and make the process so much easier!!!

There’s nothing better than making crafting easier!

Buy for yourself, treat a crafty friend or use them as team incentives.

kelly kent | mypapercraftjourney.com

CASEing the Catty #99 Holiday Tags

12371218_10153736740662158_9102306381153319857_o

Hello Sunday!

And thanks for joining me on another CASEing the Catty blog hop.  You may have come via Rachel‘s beautiful project, or you might just be starting here.

12360270_10153736740632158_545461784907666184_n

Either way, there’s lots to see – hop on through the full list to see ideas that were inspired by the tag samples in the Holiday catalogue!  If you get lost, click on the banner above to go to the main list.

Images © Stampin' Up!

So many of us CASEd the awesome tags above during the Candy Cane Lane hop – I can’t wait to see if there’s another take on this idea.


Today I’ve flicked a little further through the catalogue, but stuck with a favourite I’ve been showing you lots of – Santa’s Sleigh Thinlits.

My CASEd tags are inspired by the tags on page 25, particularly the one on the right…

Images © Stampin' Up!

I just can’t get enough of that reindeer!

Today I’ve industrialised him, neutralised the colours and stripped the design down to basics.

CASEing the Catty #99 - Holiday Tags. Santa's Reindeer. Kelly Kent - mypapercraftjourney.com

One tag is never enough, so I’ve added some friends and made a herd!

CASEing the Catty #99 - Holiday Tags. Santa's Reindeer. Kelly Kent - mypapercraftjourney.com

And then packaged them up using another of my catalogue favourites – Tin of Tags (perfect for a post all about tags!).

CASEing the Catty #99 - Holiday Tags. Santa's Reindeer. Kelly Kent - mypapercraftjourney.com

These little babies are off to market.  Quick & easy to make but striking in their finish.

Hopefully there’s other Christmas modernists who love Christmas projects that go against the traditional green & red!!!


While I was making these tags, there were a couple of tips & tricks I thought “that would be good to share”.

So, here they are!

Framelits are easiest to use with the magnetic platform – it’s a Big Shot essential!  But, the little framelits tend to ping around.

My tips –

  • Let the framelit find it’s natural position and move your cardstock to suit
  • Don’t try to use both sections of the wreath framelit at the same time – they will interfere with each other and move around.  Do the outside first and then the middle.
  • Experiment with cutting the middle of the wreath off centre – especially when hanging it around the reindeer’s neck (this won’t work if you are stamping it first!)

Foil Sheets are a beautiful addition to every project (or at least it seems that way on my table at the moment!) but they are easily ruined by the impressions left by your top Big Shot plate.

My tips –

  • In your set of 2 plates, try to keep one plate as your bottom plate that gets lots of cuts on it, and one plate ‘clean’ with no cuts (though it will get some imprints from your thinlits & framelits)
  • Cut the foil sheet down to the size of your project to avoid marking foil sheet that you may use for another project
  • Overlay copy paper on top of your foil & framelit (before adding the top plate) to minimise the marks on your top plate transferring to your delicate foil (see below)

Protecting Your Foil Sheets in the Big Shot with Copy Paper. Kelly Kent - mypapercraftjourney.com.


And that’s all done for today – a set of tags and a set of tips!

Next up on the hop is Julia Quinn & her fabulous creativity.

1931443_10153736740697158_8641773008449326149_n

If you’re feeling inspired by the beautiful tags in the Holiday Catalogue, please join us for the monthly challenege.

12687869_10154456053926686_20530042408214057_n

Kelly Kent - mypapercraftjourney.com


Product List

Big Shot

$159.00

Large Letters – Using Vellum to line them up!

Hello!  One of the products I was most excited about in the new catalogue was the Large Letters framelits & coordinating stamp set.  They are bold and impressive!

They are also a big ticket item, which makes a dent in anyone’s craft budget.

So, what are the best ways to purchase this set?

Here’s 5 quick ideas on how to get the Large Letters bundle to you with a discount…
{note all dollar values are in Australian currencies}

  1. Buy as a bundle – saving yourself 10% (over $25)
  2. Add another item (or 2) to your order, bumping yourself up to $250 and receive $25+ in rewards
  3. Hold a workshop with your family & friends, share your love of Stampin’ Up! and if the sales from your workshop are over $750, you’ll have the opportunity to buy this bundle at half price! (saving you over $115)
  4. Buy the items separately during July & earn bonus $$$. Purchase the framelits during July for $172 and then use your $9 redemption in August to purchase the stamp set for $76.  You won’t save as much, but you will be able to spread the cost out!
  5. Join Stampin’ Up! as a demonstrator for $169 and choose the Large Letters bundle as your kit content (saving you 18%) plus all your future purchases during your time as a demo will be at a minimum of 20% off retail!

As well as my savvy savings tips, I wanted to share with you how I (more or less) line up the framelits to use on a card front.

This is the card I made using the Serene Scenery DSP and Large Letters framelits.

Large Letters Framelits - how to line them up using vellum (plus 5 bonus tips on how to save money when buying the bundle!). Kelly Kent - mypapercraftjourney.com.

And this is how I did it…

  1. Using your grid paper, line up the framelits onto a piece of vellum that is about the same size as your project.

Large Letters Framelits - how to line them up using vellum (plus 5 bonus tips on how to save money when buying the bundle!). Kelly Kent - mypapercraftjourney.com.

2. Stick these in place with post-it notes or repositionable tape (you’ll need to be super careful about this – you can see my ‘R’ slipped as I ran it through the Big Shot).

3. Run through your Big Shot to make your template.

4. Lay your vellum over your cardstock & line the letters up again – into the gaps you created as part of your template -and roll through.  Depending on how sensitive your magnetic plate is, you may like to use post-its or tape again to hold the letters in place.

Large Letters Framelits - how to line them up using vellum (plus 5 bonus tips on how to save money when buying the bundle!). Kelly Kent - mypapercraftjourney.com.

5. Stick your cardstock to your card front & add in any of the little pieces needed to complete the letters (ie, the middles of the R & O)


Voila!  Your card is finished!  If you cut a template for a card you think you’ll use again, keep it somewhere safe and then next time you want to make a card, you can start from step 4.

This type of template is also perfect for lining up cut letters.

Large Letters Framelits - how to line them up using vellum (plus 5 bonus tips on how to save money when buying the bundle!). Kelly Kent - mypapercraftjourney.com.


Using templates are one of my trade secrets on how to get a better finish on your cards.  And now you’re in on the secret too!

If you live in Australia and I can help you buy a Large Letters bundle using any of the 5 tips above, or you need some vellum to make templates, please get in touch with me or shop in my online store.

If you’ve loved my tips and want to follow more of my work, then I’d love to deliver an email to your inbox every time I post.

Enter your email address to subscribe to this blog and receive notifications of new posts by email.

Kelly Kent - mypapercraftjourney.com.

Product List

Grid Paper

$19.25

A Purrrfect Birthday Among all the Christmas Cheer!

There has been lots of Christmas going on around here, but in among that, we’re still celebrating quite a few birthdays.

This purrrrfect set was designed to match the birthday invite and party theme.  I copied the invite style for the card and pussy cat on the invite for the Curvy Keepsake Box.

image

The card was another creation helped by my Cameo.  I used whatfontis.com to match the font on the invite (which turned out to be Cheri), downloaded it for free at dafont.com and used my Cameo to cut out the Happy 4th Birthday message.  The overall cards style coordinates with the invite.  I always wonder if people notice these details.  Either way, I have fun making it all match!

image

The pussy cat Curvy Keepsake Box was modelled on the pussy cat on the invite.  Do you remember the post about using the Gift Box Punch Board to make smiling mouths for punch art?  Well, it also works well for a pussy cat mouth!

image

I hope you’ve enjoyed a few tricks & tips today and a break from all the Christmas.  Only a few more sleeps to go x  Kelly

Supply List:

Tools: Big Shot, Gift Box Punch Board

Bigz: Top Note

Thinlit: Curvy Keepsake Box

Punches: Confetti Stars, Owl Builder, Cupcake Builder, Bird Builder, Itty Bitty Accents

DSP: Sweet Taffy, Brights Collection

Cardstock: Whisper White, Melon Mambo, Perfect Plum, Tempting Turquoise, Basic Black, Daffodil Delight, Gumball Green (retired)

Adhesive: 2-way Glue Pen, Stampin’ Dimensionals

ESAD Blog Hop – 2014-15 Catalogue “Seeing Stars”

blog hop - AC 2014

It’s here!  The Stampin’ Up! 2014-15 Annual Catalogue started on 1st July – woo hoo!  Another success for Stampin’ Up! – 249 pages of glorious products to buy & projects to try.  I’ve signed up for another Blog Hop coordinated by the lovely ladies at ESAD.  This will give you 24 blogs to ‘hop’ your way through and see lots of new catalogue ideas!  If your hopping has already started, then you’ve come from Libby’s blog.  Next, you’ll be off to Amity’s blog (you can find the full list of bloggers at the bottom of this post).


What is ESAD?

ESAD stands for “Extra Special Australasian Demonstrators” and is a Facebook group just for Australian and New Zealand Independent Stampin’ Up! demonstrators.

We love what we do & love to share with our customers, friends and blog visitors. We also share what we love in our ESAD Demonstrator community, through swaps, challenges, sharing knowledge, ideas& friendship and we’re always there to help and support each other.

So if you are a Stampin’ Up! demonstrator located in Australia or New Zealand then please feel free to leave me a comment with your email address then I’ll contact you with information on how to join our group.


SEEING STARS: I’ve chosen a theme of ‘stars’ to share with you today.   There are quite a few stars within the Stampin’ Up! range.  Here’s a visual comparison of the different stars you can punch/die cut (including some retired ones for comparison in case you still have these in your collection):

Star Comparison-001

I think stars make for lovely male / neutral cards (and great female cards, kids cards, baby cards … suitable for all occasions in fact!).  My first star card is all about layers.   I loved the layered effect you can get when using Stampin’ Up!’s coordinating range.  Start by sponging ink through the new (and fabulous) Star Decorative Mask (133777) to create a background of cascading stars.  Add a couple of Stars Framelits (133723) with a stamped layer to add texture and a happy birthday message across the bottom.  The final result is a simple but stunning neutral card ready for that special someone.

IMG_0348

I then used the ‘negative’ created by the large Mossy Meadow start to create a 4″ square note card.  I added Mossy Meadow chevron DSP (from the In-Colour Paper Stack) and more stars to the middle.  By perfect coordination, the stamp I’ve used from Be the Star set matches with the smallest Stars Framelit & the star from the Itty Bitty Punch Pack.  5 of these note cards together would make a great gift!

IMG_0349

Supply List:

  • Big Shot (113493) & Magnetic Platform (130658)
  • Framelits: Stars (133723), Bitty Banners (129267)
  • Decorative Mask – Hearts & Stars (133777)
  • Itty Bitty Punch Pack (133787), Banner Punch (133519)
  • Cardstock: Mossy Meadow (133683), Whisper White (106549), Basic Black (121688)
  • Ink: Mossy Meadow (133645)
  • Stamp Sets: Be The Star (135734/135731), And Many More (134276/134273)
  • DSP: 2014-16 In Colour Paper Stack (133705)
  • Accessories: Sponge Daubers (133773)

Thanks for visiting me and my stars.  If you love stars as much as I do, then you’ll love some of the products that are making an appearance in the holiday catalogue – starting 28th August 2014.  Any guesses???

Please continue on your blog hop journey to Amity’s blog, where you’ll find more inspiring samples using products from the 2014-15 Annual Catalogue.  And if you’ve got time, leave a comment or two for the participants 🙂  Kelly x


Full list of Blog Hop Participants

1.   Emily Campbell

2.   Kelli Gordon

3.   Sharlene Meyer

4.   Delys Cram

5.   Keryn Campbell

6.   Monique Fielder

7.   Kathryn Ruddick

8.   Narelle Hoggard

9.   Ann Gerlach

10.   Libby Dyson

 11.  Kelly Kent – you are here!

12.  Amity Knight

13.  Christie Kunkel 

14.  Louise Layton

15.  Andrea Buckland

16.  Yvonne Walker

17.  Sally Williams

 18.  Debbie Lamb

19.  Nerida Carter

20.  Richelle Fletcher

21.  Norelle Targato

22. Rochelle Blok

23.  Clare Mcilhatton

24.  Tracy Speight


Unconvention 2014 – The last hurrah – Erin’s Sketch Challenge

Unconvention Sketch - Erin.jpg

We’re finally at the last Unconvention challenge!  What a lovely group of ladies who created great challenges to keep us all busy during Unconvention weekend.  The final challenge was Erin’s sketch challenge.  I’ve never made a card similar to this, so I was excited to try the three panels in the background.  I used one continuous piece of DSP for the background, cut into three segments.  I love the continuity of seeing the pattern across the three panels.  The finished product was bold & bright – a grand finale!

Did you notice my sentiment strip in the middle has a border that matches the framelit?  It’s quite easy to do, here’s how:

  • Create a border for your framelits by cutting & embossing at the same time.  Make the following Big Shot ‘sandwich’ – Magnetic Platform, Cutting Plate, cardstock for smaller piece (I used Very Vanilla), Framelit (with smooth edge on top), cardstock for bigger piece (I used Basic Grey), Cutting Plate.  Run this through the Big Shot.  Your ‘smaller piece’ will have cut and your bigger piece will be embossed.  Using scissors, cut around the imprint left by the framelit.  This will give your smaller piece a border.  Note: this works better for some framelits than others and the finished product is somewhat reliant on your fussy cutting skills.  Framelits with lots of edging detail may be more difficult to cut neatly.

My other tip (not a new one) for creating a card with a knock-out colour palette – use the colours in the Designer Series Paper (DSP) as the starting point for your colour choices!  This way it all coordinates and the colours have been balanced by a design team.  Colours for each of the current DSPs can be found in the catalogue (pages 150 – 154).

Unconvention taught me so much, allowed me to try quite a few new things and pushed me to create differently to my usual card projects.  Thanks ladies – see you next year [unless a miracle happens and I get to the Gold Coast for Convention!].  Kelly x

IMG_0216

Supplies:

Tools: Big Shot

Framelits: Apothecary Accents

Thinlits: Circle Card (star)

Punches: Cupcake Builder

DSP: Birthday Basics

Cardstock: Crumb Cake, Raspberry Ripple, Basic Grey, Very Vanilla, Gumball Green, Island Indigo

Ink: Island Indigo, Summer Starfruit

Stampin’ Write Marker: Island Indigo

Stamp Sets: Sassy Salutations, Simply Stars

Extras: Paper Snips


Vivid Vases – It’s a Whole Lot of Wonderful

I have noticed a trend in my Stampin’ Up! purchases.  The ones I ponder over the most – add to an order, remove from an order, add again and finally purchase … are the ones I end up falling the most in love with.  It happened with the Hardwood Background Stamp [can you believe I almost didn’t buy it!!!] and now it’s happened with the Vivid Vases single stamp from the Occasions catalogue.  I made a few of this particular very simple, but very stunning card to give to people who I wanted to thank.  One got sent Grandma’s way to say thank you for making my girls some great winter tracksuits, one got sent to Stampin’ Up! Demonstrator Support to say thanks for all the hard work they do and I’ve kept some for a rainy day.  It’s always lovely to get a ‘just because’ type card in the mail and I think the phrase on Vivid Vases could apply to a range of situations and recipients.  The quality of the Stampin’ Write Markers makes colouring a breeze, though I have seen some great cards on Pinterest that have DSP vases.

20140429-101726.jpg

To line the stamp set up evenly I used a few of my “tricks”.  Do you own a Stamp-a-ma-jig (SAMJ)?  These are one of the greatest products in the SU! range.  It allows you to position your stamp exactly where you want it every time.  Now, for a stamp set like Vivid Vases, that only comes in wood, the positioning is going to be the same on the SAMJ sheet every time.  So my first trick is to create a permanent SAMJ sheet that you can keep with the stamp set.  Cut a piece of Window Sheet to the same size as the wood block of the Vivid Vases stamp.  Put aside the sheet that comes with the SAMJ and line your newly cut window sheet piece with the SAMJ handle.  Stamp the Vivid Vase image onto the window sheet using Jet Black Staz On Ink.  Now, when you want to use the stamp with your SAMJ, you don’t have to stamp it first, you can just line up your window sheet & handle, remove the sheet and stamp perfectly.

20140429-101732.jpg

My next tip is how to get the sentiment parallel to the bottom of your card.  I use this trick all the time to line up my stamping when the edge isn’t close to my stamp.  Cut a piece of scrap cardstock that is the same width as the gap you want between the bottom of your card and the stamped image.  For example, if you’d like it 1″ from the bottom, then cut a piece of cardstock that is 1″ wide.  Place a small amount of 2-way glue onto the back of this piece and allow to dry until it is tacky.  Place this cardstock guide strip along the bottom of the card.  Using the SAMJ, line up the bottom of the stamp with the top of the guide.  This will make it straight and perfect every time, without having to judge by eyesight alone.  Once you’ve stamped your Vivid Vases image, remove the cardstock strip.  It should gently ease away from the card base, as the 2-way glue become repositionable when allowed to dry before adhering.

Hope you’ve enjoyed my two tips for getting it straight.  Try them yourself and let me know how it goes!  I love hearing from you.  Kelly x


Zoo Babies Two Ways

When creating cards, I often make two at the same time.  There is a number of reasons for this but the two mains ones are efficiency (I can make two cards in almost the same time as one and then I have an extra one to add to my stash) and one piece of cardstock gives two C6 card bases – so it just makes sense!  Usually I make two of exactly the same card.  But sometimes the finished products have subtle differences that result in two unique cards.  And that’s what happened with my Zoo Babies cards.

My aim was to make a ‘congratulations’ card for a friend who just added baby Hector to her world.  As the name suggest, Zoo Babies is perfect for baby cards!  The first card I personalised with a “H” and the second card I added a few more animals to create height.  Same same but different.  My basic colour combination of Night of Navy, Old Olive & Daffodil Delight was inspired by the Colour Coach and I then added in Real Red to brighten it up a little.  My ‘sweet baby’ banner is from Itty Bitty Banners, cut out using the matching Framelits.

Do you love the ‘stitching’ around the edge of the card mat?  I do this quite a lot – I think it gives the cards a nice ‘finish’.  Using a Stampin’ Write Marker (I used Basic Black), draw little dashes along the four sides of the cardstock.  It doesn’t have to be even or neat, just somewhat straight to follow the edge.  The more you do it, the better you get at it.  I find the Stampin’ Write Markers result in the best finish.  Gel pens can leave gaps in the middle of your dashes and look patchy.

I encourage you to start thinking about making two cards at a time.  The hard part about making any card is the design, so once you’ve got that sorted, it would be a shame to just make one card!  Plus, you’ve already got everything out… or if you craft like me, you’ve dug through the pile of products on the table to find everything!  Hehe!!!  Have a great day, Kelly x

20140422-092438.jpg

20140422-092444.jpg

Journeying Towards Perfection – 10 tips for getting it right

postcard image - top 10-001

People are very kind with the praise they send my way for my cards and projects, which makes me feel all warm & fuzzy.  Some of my cards are originals, some are copies of others.  But there is always one thing that remains the same – the finish.  The difference between a good card and an excellent card is all in the finish.  Here are my top 10 tips for creating cards with amazing finish, which I hope you will find useful if you are an experienced crafter or one who is just starting out.  Kelly x

  1. Use QUALITY products – your final product is only as good as what you put into it.  Cards made with cheap or inferior products can look this way.  All of Stampin’ Up!’s products are guaranteed to be of the best quality, which ensures you are well on your way to creating fabulous works of art!
  2. Make it STRAIGHT – the first thing someone will notice about a card is wonky bits.  To the best of your ability, line everything up straight.  Make sure your mats have equal distance around all sides, that your strips line up straight, that your sentiments are straight.  If you have problems with straight, you can use templates or guides to help you [I’ll be writing a blog post about this soon].
  3. Make it NEAT – just like wonky cards, messy cards are incredibly obvious.  Errant glue, smudgy fingerprints and fuzzy edges will be noticed!
  4. Find the MIDDLE – if you’re aiming for something to be in the middle of the card – measure this.  If it’s supposed to be in the middle and it’s off, it’ll be glaringly obvious.  The other option is to avoid the middle.  Put sentiments in corners, DSP strips along the top, stamps in patterns that are random by choice.
  5. Find the BALANCE – the finished result of a card should be one that looks cohesive.  Find the balance of all of your components including size, shape and position.  Remember the rule of 3 – things always look good in threes.
  6. STAMP WELL – stamping that is smudged or images that bleed can let your whole card down.  Keep your images crisp and clear.  This is especially important for sentiments.  Use fast drying inks and quality rubber stamps (like the Stampin’ Up! ones) and be careful with your pressure.  With the new style ink pads, too much pressure will end up with ink all over you and your project.
  7. Use MATS – the most professional of cards & card makers, always use mats (note: a mat is an extra piece of cardstock or DSP around your main piece that borders it).  This helps your card to look ‘finished’ by added extra depth.
  8. Lots of LAYERS –You can push a card into the world of OTT, but by adding extra layers, you can often lift your card from good to excellent without too much effort.  Add a banner behind your sentiment, a couple of layers of flowers, another piece of DSP or some pretties – ribbon, buttons, brads.
  9. CO-ORDINATE your colours – One of the best features in the Stampin’ Up! range is the level of coordination within their colour range.  Cards with excellent colour coordination will always ‘pop’.  Luckily, there aren’t too many colours in the collections that clash.  If you don’t feel very confident about your ability to choose colours that match, Stampin’ Up! is perfect for you.  Select a DSP and use the colours in the DSP as your guide.  Buy a colour coach and use the suggested colour combinations.  Create in colour collections (ie, 2013-15 In Colours) – these have been balanced and put together already.
  10. Include TECHNIQUES – with the number of friendly Stampin’ Up! addicts in the world, and the availability of internet, there is no excuse to make the same boring cards over and over again.  Jump on you tube, Google Stampin’ Up! or subscribe to your favourite blogs.  You’ll be able to access thousands (and then some) of free tutorials and project ideas.  Include some of these techniques to make your card special.