Flower Patch – Oh So Pretty!

image

I can’t get enough of Flower Patch at the moment.  Because it’s photopolymer, it’s easy to use and the framelits help with the cutting out.  This card is a case of Sharon Burkert’s card with a different colour scheme.  [I’m still in love with Blackberry Bliss].  I loved the finish of this card so much I made some matching tags.  It’s lovely to have a hobby that adds so much pretty to the world!  Hope your day is ‘blooming’!  Kelly x

image

Supply List:

Tools: Big Shot, Magnetic Platform

Framelits: Flower Fair (bundle)

Punch: Project Life Corner, Scalloped Tag Topper

Cardstock: Strawberry Slush, Whisper White

Ink: Strawberry Slush, Blackberry Bliss, Perfect Plum, Bermuda Bay, Coastal Cabana, Tuxedo Black Memento

Stamp Set; Flower Patch (bundle), Festival of Trees

Embellishments: Strawberry Slush Ruffled Ribbon (retired)

Extras: Paper Snips

Christmas Stamp-A-Stack – Festival of Trees

Card #4 – Traditional trees, modern colours.  I love tags on card fronts – great centrepiece for a tree or two (or a ‘Festival of Trees’!).  Merry Christmas, 3 months to go… have you started your cards yet?  Will you go traditional, modern or a combination of the two?  Kelly x

image

Holiday Catalogue Supplies:

Festival of Trees Photopolymer Stamp Set (Bundle)

Tree Punch (Bundle)

All is Calm Designer Seriers Paper

Lost Lagoon Silky 3/8″ Taffeta Ribbon

Handheld Stapler (& Staples)

Good Greetings Stamp Set *** free with every $300+ order until end of October 2014

Scallop Tag Card – French Door Style

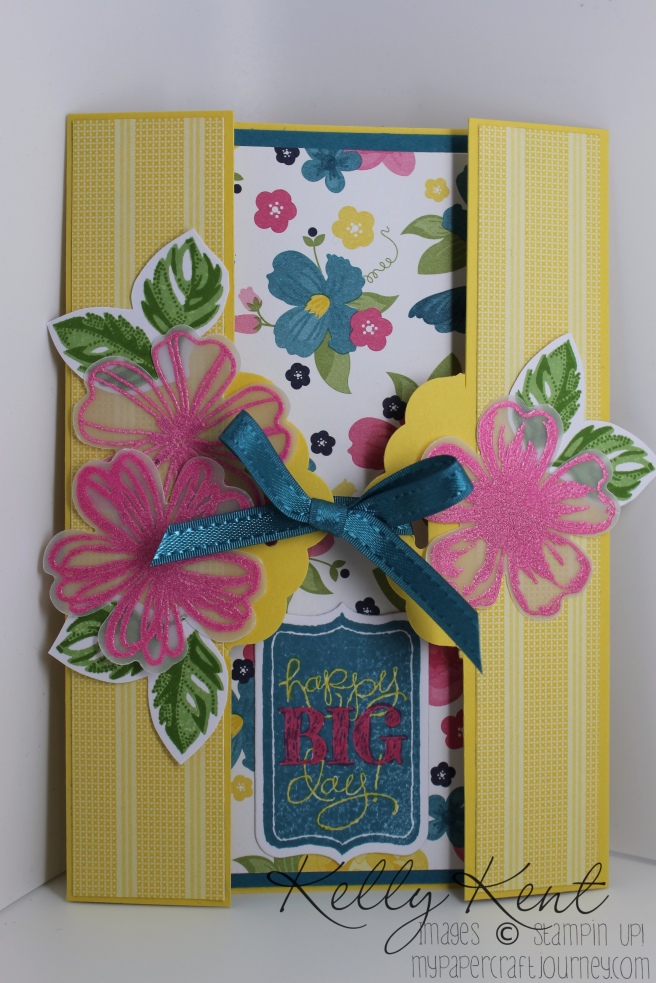
Remember the very popular Scallop Tag Closure Card?  Most of the ones I’ve seen (and all of the ones I’ve made), the tags meet up on the right side of the card.  I wanted to show off some lovely (retiring) DSP, so have changed the folds and now the tags meet up in the middle.  It reminds me of beautiful French doors with a lovely garden view!  This card is for a lovely friend, who was lucky enough to keep her birthday to herself after her daughter arrived into the world the day before!  (See yesterday’s post for Sophie’s birthday card).  Happy Birthday Narelle – may your day be peaceful, calm & filled with delight!  Kelly x  PS, I particularly love the vellum embossed flowers on this card – I hadn’t tried this before but will definitely be doing it again – the effect is lovely!

IMG_0272

Quick instructions:

1. Take half a piece of A4 cardstock (the size you usually use for a C6 card)

2. Mark each short side at the half way point.  Insert into your Scallop Tag Topper Punch and line up so the mark is in the middle of the punch.  You’ll need to feed your paper above the paper guide on the punch and look at the back to see your mark.  Punch each side.

3. Line up your cardstock in your paper trimmer so you cut off the excess card on each side of the tag (do this on both sides with tags).

4. Place your cardstock in your Simply Scored and score 2″ from each tag.  Fold your card up so that it looks like French doors.  Decorate as desired.

Supplies:

Tools: Big Shot

Framelit: Chalk Talk

Punches: Scalloped Tag Topper Punch, Pansy

Cardstock: Daffodil Delight, Island Indigo, Whisper White

Specialty Paper: Vellum

DSP: Gingham Garden^

Ink: Island Indigo, Wild Wasabi, Gumball Green^

Stampin’ Write Marker: Melon Mambo, Daffodil Delight

Embossing Powder: Melon Mambo^

Stamp Sets: Flower Shop, Stippled Blossoms, Chalk Talk

Accessories: Heat Tool, Paper Snips, Stamp-a-ma-jig, retired ribbon

^ Denotes a product is on the 2014 Retirement List.  Retirement List products available until 30 June 2014 or sold out.


Happy Easter

Happy Easter!  I hope you’ve had a great day.  My long weekend started with the wonderful wedding, and has continued with lots of socialising with close friends & family.  Today we had breakfast with my family, followed by an Easter hunt, then a trip to see the Dinosaur exhibition at the museum and finished with a yummy roast dinner!!!  And would you believe I’ve only eaten two small eggs today?  The night is still young though, and I’m sure I can fit a few more in before bedtime.

Easter presents were largely chocolate free for my little misses.  The older one has food intolerances and normal chocolate doesn’t agree with her.  The younger one is still too little to know what chooclate is, but I suspect that will change soon (she’s finally come around to the enjoyment of food and can’t get enough).  So amongst the pajamas, books, clothes and knick knacks they got were these two beauties that I’m sharing with you.

This box had a necklace and bracelet set from Nanna in it.  Nanna is a Stampin’ Up! addict too and made the sweetest little bunny box using the Scalloped Tag Topper Punch (inspired by Carol’s creation here).

20140420-165716.jpg

The other favourite Easter present was a beautiful painting set by Typo from Uma & CaCa (Uncle Mark and Aunty Caris) with paint colours that were so reminiscent of Stampin’ Up! range, I had to share!  Do you see Stampin’ Up! everywhere you go?  I present to you our Calyspo Coral, Pistachio Pudding, Bermuda Bay & Summer Starfruit bunnies.  Happy Easter!  Kelly x

20140420-165722.jpg

One sheet, 12 beautiful Watercolour Tags

Tags are simple, quick & easy and one of my favourite things to make.  Today I used the Happy Watercolour stamp set to create 12 tags.  Using my dimensions, you’ll get 12 tags from 1 sheet of A4 cardstock.  I used Whisper White as my base.

20140405-204039.jpg

Using your Stampin’ Trimmer, cut the cardstock down the long side at 2″.  Do this until you’ve run out of card.  You should end up with four 2″ strips (and a piece of scrap).  Now cut each strip at 314.  You should end up with 3 rectangles from each strip (and a tiny piece of scrap).  When finished all your cutting, you’ll have 12 pieces in total.  Punch each rectangle using the Scalloped Tag Topper Punch.

20140405-204045.jpg

Watercolouring: Select 6 different coloured inks – I used Wisteria Wonder, Crumb Cake, Pistachio Pudding, Coastal Cabana, Crisp Cantaloupe & Daffodil Delight. Using the ‘wash’ stamp from Happy Watercolour, stamp the tag 3 times, reinking and rotating 180 degrees between each stamping.  It may look a little dark and defined when you first stamp, but it will blend and lighten as it dries.  Repeat for another tag, then swap colours for the next 2 tags.  Repeat until you’ve used all your colours & tags.  Ink the flower stem in Jet Black Staz On and stamp over the top of the watercoloured ink.  Do this for each of the 12 tags.

Gorgeous Watercolour – so simple!  Kelly x


Scalloped Tag Punch again!!! Mini Square Boxes

Although I love creating and designing, the world is filled with very talented people, who I could happily spending my time CASEing.  I saw a photo of this project when shared on Facebook by the very talented Libby Dyson.  There are a few variations floating around (the original might be by Oxana in Germany).  I was too impatient to wait for Libby to upload her measurements, so I set about creating my own.  There are times when papercraft seems like 99% maths and only 1% paper!  My box ended up with a square base and can be made using a 6×6 square of DSP – this is great for me, as I can get 4 from a sheet of DSP.  With Easter in mind, I used the circles from the Watercolour Wonder DSP pack and filled it with little chocolate eggs.  Perfect size treat to give to a friend.  One Easter egg for the box, one for me … Kelly x

20140318-121158.jpg

Instructions:

  • Start with 6×6 DSP or cardstock.  Score at 14, 20, 40 & 412.  Turn 90˚ and repeat the same scoring (14, 20, 40 & 412).
  • Insert your DSP into the punch.  It won’t fit down the guide, but rather sit the DSP on top of it.  Line up the outer edges of the top piece of the punch, with the 2” & 4” score lines (see picture).  This will ensure you get the punch relatively in the middle of your DSP.  Punch in this way on two opposite sides of your DSP.
  • ut the corners from your DSP as shown in the template, which will leave you with your box to fold up.  Use ribbon to tie the tags together.  I added reinforcement to the tags by cutting a 20 strip of cardstock, punching one end with the scalloped tag punch and then cutting it off the strip at 12 .  Adhere this to the inside of your tag closure to make it stronger and more durable when tied with ribbon.  Repeat for the other tag closure.
  • Embellish as desired, fill with whatever treats you wish!

20140318-153931.jpg

20140318-153926.jpg

Just Add Ink 207

Another week, another challenge.  This week I’ve chosen Just Add Ink as my inspiration.  I’ve just stamped & cut 60 “Happy Mother’s Day” sentiments for Alexa’s day care room, so must have Mother’s Day on my mind!  Kelly x

20140321-115257.jpgSupplies:

Tools: Big Shot

Framelits: Deco Labels

Sizzlits: Delicate Doilies

Punches: Scalloped Tag Topper, Pansy, Petite Petals, Banner

Stamp Sets: My Mother, Flower Shop, Petite Petals

Ink: Real Red, Black Staz On

Stampin’ Write Markers: Real Red

Cardstock: Real Red, Whisper White, Basic Black

DSP: Fresh Prints Stack

Extras: Whisper White Baker’s Twine

Original Sketch JAI 207


Dynamic Duos #93 Soft Pink & Stone

Participating in a card challenge has always been on my list of things to do.  And today I finally got the chance!  The colours put forward by the Dynamic Duos are soft pink (Blushing Bride) and stone (Sahara Sand).  I think this combination is just gorgeous.  Here is my entry:

20140310-100959.jpgSupplies:

Cardstock: Sahara Sand, Blushing Bride, Whisper White

Ink: Blushing Bride

DSP: Subtles Paper Stack (Blushing Bride, Polka Dot pattern)

Stamps: Petite Petals, Happy Watercolour

Punches: Scalloped Tag Topper, Petite Petals

Ribbon: Smoky Slate Chevron, White Baker’s Twine

Accessories: Pearls

DynamicDuos93


Weekend Tutorial Time – Tea & Yums

 I found this gorgeous tea bag & treat holder on Pinterest some time ago (original post here) and with a few loved ones having birthdays in March, I thought it would be perfect to try out.  I had a play with the measurements to fit Australian A4 paper size and changed the top to a scalloped tag top.  The particular design I ended up photographing for this blog post is for my husband’s Grandma.  She lives on a rural property and loves ducks.  There is a long running joke about some wooden pond ducks that had baby wooden ducks…. poor Grandma, they had her going for days!  Based on this, the theme for her present is “Wetlands” – a nice choice as it’s one of my very favourite Stampin’ Up! sets.  As well as her “Tea & Yums” gift, I have also made her a gift set of cards and a notecard set.  I’ll write about both of these in separate blog posts.

20140307-212147.jpg


20140307-212154.jpg

Instructions:

These instructions are written as best as I can describe each step.  The original post has excellent photos and I recommend you refer back to them if you’d like to see each step in pictures.  My post is useful for Australian measurements.

  1. Cut a piece of Midnight Muse cardstock – 84 x 118. (Do this by trimming a small amount off the short edge).
  2. Place your cardstock on your Simply Scored so that the numbers run along the short edge.  Score at 210 & 510.
  3. Rotate and line up the long edge.  Score at 14, 20, 410, 614, 98, & 104.
  4. Place the Diagonal Plate onto your Simply Scored with the lines running towards the bottom right corner.  Score on the diagonal, starting at 614 and stopping when you get to the corner of the box.  Turn the cardstock 180 degrees and repeat.  Turn your cardstock over and do this again to the remaining two boxes.
  5. Cut & discard the outer two boxes in each corner.  I also trimmed the corners of the outer triangles, as this allowed the box to fold easier.  See the project template below – cut where shaded.
  6. Fold along all lines, creasing well with a bone folder.
  7. Cut two pieces of DSP (I used Midnight Muse from the In Colour 2013-15 Paper Stack) 24 x 24.  Cut these on the diagonal so you have 4 pieces.  Adhere these to the middle of the inside triangles.
  8. Turn your cardstock over, so the side you’ve just adhered the DSP to is face down.  Fold the outer triangles into the middle and then fold the remaining shape into the middle.  [The DSP should now be on top].  The two outer shapes will overlap and form the front of the box.  Keeping them on the outside, fold the box up so it sits as shown in the picture.
  9. Feed one edge of the box into the Scalloped Tag Topper Punch.  Rather than sliding down the middle, it will sit on top of the guide.  Push it as far as it will go.  Line it up so your tag will punch roughly in the middle.  Repeat this for the other edge.  Trim the excess where the punch doesn’t cut.
  10. Line up your box and punch/prick holes where you want your brads to go.  Put brads of choice into the holes.  This will hold the box together.  For extra strength (and pretties), add a ribbon into the hole created by the Scalloped Tag Topper Punch.
  11. Embellish as desired.  I used the duck and the wading birds from the Wetlands stamp set.
  12. Fill as desired.  I placed a tea bag in the both pouches and then a yummy treat in the middle.  It turns out a 5 pack of Tim Tams fits perfectly!

20140307-212132.jpg

So, there we go – another tutorial to keep you busy this weekend.  I hope you were able to follow my instructions.  Once you’ve done one, it all makes sense!  Kelly x


Weekend Tutorial Time – Tag Closure Card

It’s the weekend!!!  When you’re a SAHM (Stay-At-Home-Mummy), this doesn’t mean too much different than a weekday, but I do have fond memories of finishing work on a Friday afternoon knowing that you’d have some time on the weekend to kick back and enjoy something of your choosing.  So, today and tomorrow I’m offering you two tutorials to inspire you to make your ‘downtime’ craft time.

Today’s project is a Tag Closure Card.  I’ve seen lots of these floating around Pinterest and this is inspired by some of these, but I wanted to make the tag closure section a little easier.  Rather than trimming down the card front, I have added the tag closure as a strip around the card.

20140227-221051.jpg

Instructions:

  1. Cut a piece of Coastal Cabana cardstock – 514 x 514Score at 112. This is your card base.
  2. Cut a strip of Coastal Cabana cardstock – 20 x 84Score at 18 & 510.  This is your tag closure.
  3. Using the Scalloped Tag Topper Punch, punch each end of the strip so you end up with scalloped ends.
  4. Adhere the tag closure strip around the middle of the card base so that the smaller section is at the right of the card and the biggest section is along the back and it folds around to overhang the flap on the left of the card base.
  5. Cut two pieces of Crisp Cantaloupe cardstock – one 18 x 510 & one 313 x 510.
  6. Cut Sweet Sorbet DSP – 14 x 56.
  7. Cut Whisper White cardstock – 39 x 56.
  8. Adhere the matching sizes together than add the skinny piece to the front panel of the card (over the top of your tag closure) and the large piece to the inside.
  9. Embellish as desired.  I’ve used ‘happy big day’ from the Chalk Talk bundle in Pistachio Pudding and tied it together using the Summer Starfruit twine, which is one of the free Sale-A-Bration gifts (available until 31st March).

Obviously with the design as it is, once you write on the card, you’ll see that, even with the card tied closed.  I don’t mind this at all, as I can just imagine it sitting on display in someone’s house, open and standing up, with the message visible as part of the card’s appeal.  But, if you prefer, you could add stamps and embellishments to the inside section of the card and add another piece of Whisper White cardstock to the reverse side of the card for your message.

Hope you get a chance to make one of these this weekend.  If you’d like to book a workshop for you and your friends, to learn how to make amazing cards like this one, let me know.  I come to you and bring everything we need.  Now that sounds like a good way to spend some of the weekend!  Kelly x