The Outgoing & the Incoming

I trust you’ve all had a chance to look at the retirement list for 2015.  If you haven’t, you can find the links to the lists here.  Some things are already sold out, so don’t delay – order your retiring favourites now!

It’s a wonderful time of change, a great opportunity to pick up some bargains (some products are an amazing 50% off) and the anticipation of what is to come.

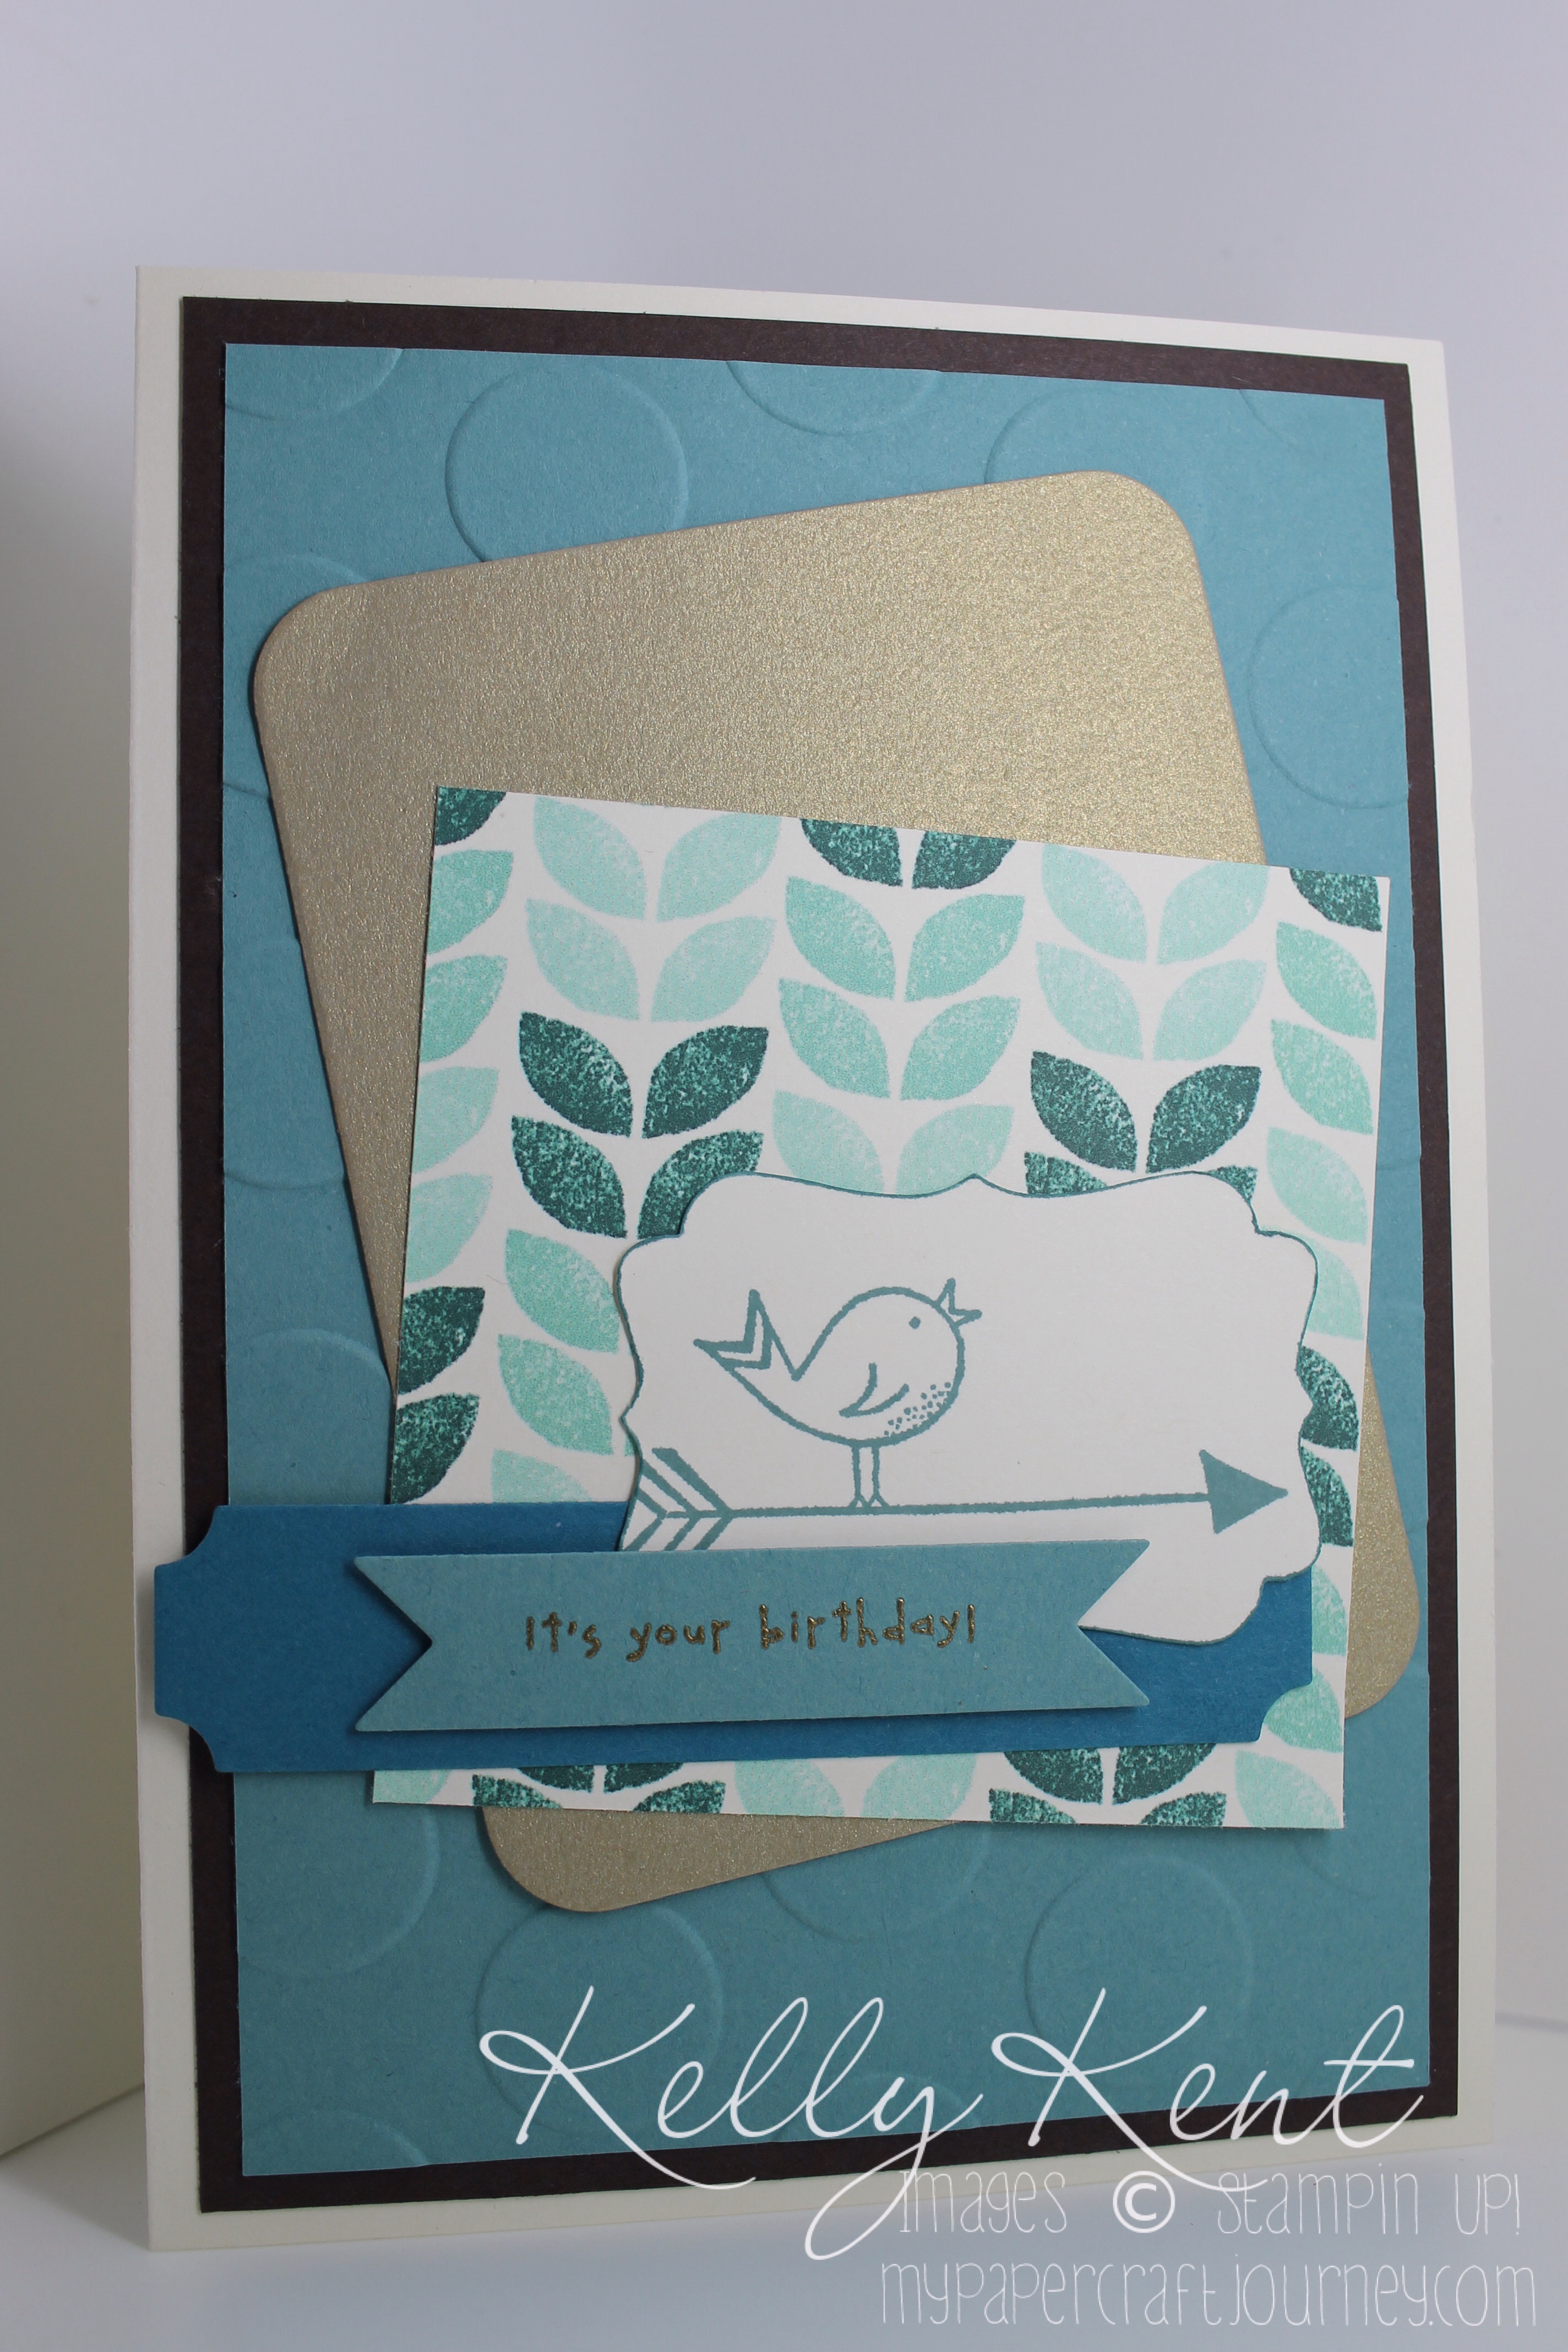
This is a baby card I made for baby Aiden who joined the world this month.  Outgoing products to celebrate the incoming cherub!

image

MDS and all digital downloads are available (at 30% off) until 2nd June 2015.  After this time, it won’t be possible to purchase the software or digital content, but everything you have previously purchased and downloaded will still work.   The exception to this is the Stampin’ Up! Project Life content which will continue to be available after 2nd June through ProjectLife.com.

Keep checking back for retirement list inspiration & updates.  And soon, new product sneak peaks!!!  It’s a big couple of months of outgoings & incomings and I’m excited to be sharing it with you.  Kelly x

What’s Going…

*** Sweet Dreams Designer Series Paper features in the 2015 Occasions catalogue and has been added to this week’s Weekly Deals.  It is not officially on the retirement list but is likely to be unavailable after 2nd June 2015.

All products on the retirement list are available while stocks last.

What’s staying…


The hostess code for April is QRYKATGK.  Shop online using this code and I will send you a free gift!

1st Birthday Strawberry Kisses

Little Lucy turned 1 this week and had a strawberry themed family celebration.  And, as I love a good theme – I couldn’t resist making her a sweet birthday card for the occasion.

Do you recognise the shape I’ve used for the mat card centrepiece? It’s actually the Decorative Label punch taken from MDS, imported into Silhouette Studio & cut out with the cameo.

Happy birthday Lucy – may all your years be as sweet as your first!  Kelly & the strawberry patch kids x

image

Product List

Big Shot

$149.95

*** Don’t forget that it’s Sale-A-Bration until 31st March – earn a free SAB gift for every $90 you spend. Order online during March 2015 using the code VN7MZ4ET to receive another free gift from me! ***

Young Love, Babychinos & Marshmallows – JAI 250

I hope you had a lovely Valentine’s Day.

We celebrated Alexa’s 4th birthday with an apple themed party in the morning, a relaxing afternoon (including a nap for this tired Mumma!) and then a tapas and cards date night for me & Mr Papercraft.

As it turns out, Mr P & I weren’t the only ones celebrating Valentine’s Day in our house.  Alexa was surprised with a truly gorgeous bunch of flowers from her bestie, Cooper. Young love!

image

The photo inspiration from Just Add Ink this week gave me the perfect opportunity to make a card for Alexa to give Coops in return.

JAI250

What does polka Dots, pink hearts & ‘coffee’ for kids in love translate to?  Babychinos & marshmallows!

image

The coffee cups are from the Perfect Blend stamp set.  For this card, I used the digital download rather than the actual stamp, which allowed me to resize the cups to create two babychino size versions that fit beautifully on the card front.

If you’re the parent of a youngster, chances are you’ve been for babychinos.  If not – you’re missing out on a tiny cup filled with warm, frothy milk and sprinkled with chocolate, with marshmallows on the side.  They didn’t have babychinos when I was little!  Today’s kids are totally spoilt!!!

By using MDS, I was also able to create a custom sentiment – “we go together like babychinos & marshmallows” – in my favourite fonts.

Thanks to Coops & his mum for making Alexa feel like the most special girl in the playground!  Kelly x

Product List

Big Shot

$149.95
Glue Dots

$8.95


*** Don’t forget that it’s Sale-A-Bration until 31st March – earn a free SAB gift for every $90 you spend. Order online during February 2015 using the code 3WK4SDJB to receive another free gift from me! ***

First Day of Kindy – done & dusted!

Well, the first day of kindy is done & dusted.  No tears, it was a beautiful day!

Late last night (because that’s how I roll), I decided I wanted a funky sign for Alexa to hold in her ‘first day’ photos.  Here’s what I whipped up using MDS (I love how easy MDS is to use – and comes with all my favourite SU! colours).

image

I kept the style similar to the teacher Survival Kit tags, because we know I love things that match!  Here’s my big girl on her first day.  Such a proud Mumma!  Kelly x

image

Product List

First Day of Kindy – Teacher Back to School Survival Kit

Today is the first day of kindy for my big girl (though she’ll always be our ‘baby’!).  I’m excited for her and the new adventures that this chapter of her life will bring.  I’m sure there will be lots of other feelings floating around today for those of us that are new to the kindy scene… nerves, happiness, oh-so-proud – it’s a big childhood moment!

In the lead role of the kindy production is the brave teacher & teacher’s assistant that we are entrusting our little people to.  For some, it will be the first time their child has been in the care of someone outside their family.  For others, it’s a new person to meet & get to know.  For the teachers – that’s a lot of emotion & newness (times 20!).  At the start, it’s survival time for all – and to go with the occasion, I’ve made a Back to School Survival Kits for Alexa’s teacher and assistant (yes Mr Papercraft – the teacher’s ASSISTANT … not the teacher’s “sister” – that would have been a coincidence!).

image

I have packed each kit with :

  • tea & coffee (caffeine is a must when dealing with little people!)
  • Sharpies & Post-its (every teacher I know is a stationary addict!)
  • mints and chocolate (when faced with 20 excited 4 year olds, they might need a sugar hit!)
  • Panadol (there are sure to be a few headaches!)
  • ear plugs (I know how much noise 1 kindy kid makes – imagine 20!)
  • antibacterial wipes (we love them, but kindy kids can be snotty little gems!)

image

I’ve packed the goodies into a large jar, so that when the survival mode is over and it’s full steam ahead, the jar can be used again (you’ve got to love gifts with leftover storage!).

The tag was a MDS creation using the chalkboard background from the Back to School digital ensemble and a couple of new fonts (Chalk It Up & Mix Striped).  Add in a personalised message, and the decoration is all done.  I have added a copy of the tag below (without our personal message) for you to download and use for your own survival kit.

Back to School tag-002

Wishing every family with new starters a wonderful day/week/term/year/journey at school.  We are looking forward to a ~great~ year of kindy!  The Kents x

image

Product List

Giving is the Real Gift of Christmas – “Iron-On Mugs”

I love giving gifts!!! Christmas is the perfect time to be able to celebrate the people around you – by spoiling them with gifts.

image

This year, my major craft project was monogrammed mugs.

I, with the help of Mr Papercraft, made 33 of these delights to give to my colleagues and the staff at the girls’ daycare.  The letters are a My Digital Studio (MDS) download – Sweet Details Alphabet, made from iron-on glitter vinyl, which I cut using my Cameo.  Super cool idea – very awesome outcome.

image

Instructions:

To make the letter

  1. Download the Sweet Details Alphabet & Numbers Stamp Brush Set – Digital Download from the online store
  2. Import the required letter into Silhouette Studio
  3. Resize the letter, flip horizontally (it will be cutting from the back of the vinyl so you’ll need the design reversed) and trace the border using the low pass filter
  4. Cut the letter out of iron-on vinyl using your cameo

image

To adhere to the mug

  1. Wipe your mug with an alcohol swab or solution to remove any grease/oil/grime that will stop your letter from sticking
  2. Remove the clear plastic front from the letter
  3. Place your letter in the position you’d like it to be on the mug and iron carefully using a hot (no steam) iron
  4. Place your mug into a 200 deg C oven and bake for 12-15 minutes
  5. Remove from the oven and gently push against the letter (using a tea towel or oven mitts – it will be *VERY* hot) to secure
  6. Leave to cool completely

Voila!  Personalised mugs.  Of course, if you don’t have an e-cutter, you could still do this project using vinyl cut by hand.

I put a sachet of hot chocolate powder & a couple of marshmallows into the mug then wrapped them all up (the Gusseted Cellophane Bags work well for this type of packaging).

Look out tomorrow for the Christmas card I made to match the tags seen above.  Kelly x

Just Add Ink, Mojo Monday & Project Life

Today’s project was inspired by the colour combo at Just Add Ink #239:

JAI239

The sketch at Mojo Monday #371:

Mojo371Sketch

And the ever versatile Project Life cards, in this case the MDS version of the Happiness Is range. I love using the Project Life cards in the place of DSP/patterned paper. Because I used the digital version in this card, I was able to recolour the design I selected so that it fit with the colour combo (JAI challenge) – Lost Lagoon printed on Very Vanilla cardstock. And, because it’s digital, it means I can print & make as many of these as I need. So many reasons to love multi-media papercraft! Kelly x

image

Supply List:

Tools: Big Shot, Magnetic Platform

Framelits: Project Life Cards & Labels, Bitty Banners

Embossing Folder: Large Polka Dot

Punches: Decorative Label

Digital: MDS & Happiness Is Project Life Cards – Digital Download

Specialty Paper: Brushed Gold

Cardstock: Very Vanilla, Early Espresso, Lost Lagoon, Island Indigo

Ink: Lost Lagoon

Marker: Lost Lagoon

Embossing: Gold Embossing Powder, Heat Tool, Versamark

Stamp Set: Hello Love (hostess)

11 November – Remembrance Day – Say Thanks with Pleasant Poppies

11 November is Remembrance Day.

Let us observe one minute’s silence at 11 am on 11 November to remember those who died or suffered for Australia’s cause in all wars and armed conflicts.  Thank you for all you have done.  Our freedom relies on your sacrifice.  Kelly x

image

Supply List:

Tools: Big Shot, Magnetic Platform

Framelits: Chalk Talk

DSP: Typeset

Cardstock: Real Red, Mossy Meadow, Very Vanilla

Ink: Memento Tuxedo Black

Markers: Real Red, Mossy Meadow, Basic Grey

Stamp Sets: Pleasant Poppies – MDS download, Four You

Extras: Stampin’ Dimensionals

Father’s Day – Day 2: Stars

Day 2 of Father’s Day Inspiration: Stars

Kelly x

image

Supply List:

Tools: Big Shot, Magnetic Platform, Stampin’ Trimmer

Framelits: Stars

Punch – Star from Merry Minis Punch Pack, which is now retired.  The star from Itty Bitty Accents Punch Pack would also work nicely

DSP: Confetti Celebration

Specialty Paper: Silver Glimmer

Cardstock: Basic Back, Basic Grey, Whisper White, Smoky Slate

Stamp Set: MDS version (Digital) of Delightful Dozen

Extras: Stampin’ Dimensionals

Seahorses, Starfish & Baby Showers

It’s always lovely when someone trusts you with an important part of their party process.  And invites are very important – it’s the first impression your guests get of your special event.  A friend of mine is having a baby shower soon and asked me to create the invites.  Her inspiration was ocean themed with blues, greens and sandy neutrals.

This was the final product using Bermuda Bay, Lost Lagoon, Pool Party, Coastal Cabana & Sahara Sand.  The Striped Scallop Thinlits die gives it an amazing ‘ocean’ look, the sentiment is a custom made MDS creation and the sea creatures are all hand stamped & fussy cut [stamps from By the Tide & By The Seashore].  And at the very end, I couldn’t resist making matching envelopes!

As a memento for the nursery, I made her a 4×6 framed artwork using a similar design to her invites.  And of course, a matching 5″x3.5″ notecard & envelope.

My heart flutters when everything matching so beautifully!  I’m exited about another precious baby entering the world!  Oh sweet baby!  Kelly x

IMG_0429

IMG_0430

IMG_0431