Social Stamping | sympathy

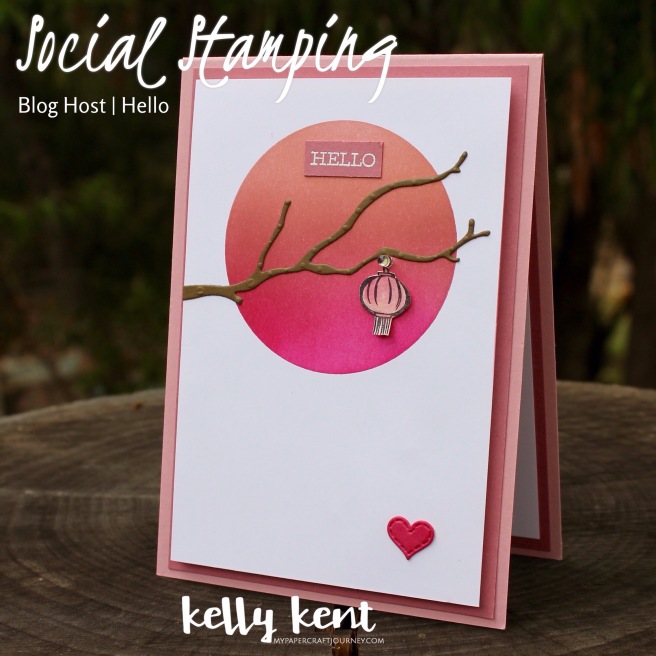
Welcome to Social Stamping – the first of the monthly hops focused on social greetings as themes.  If you joined us for any of the 15 weekly Social Stamping hops, you’ll be familiar with the blog hop style, linked to each other and also a main blog host post.  Click here to see a full list of designers participating today.

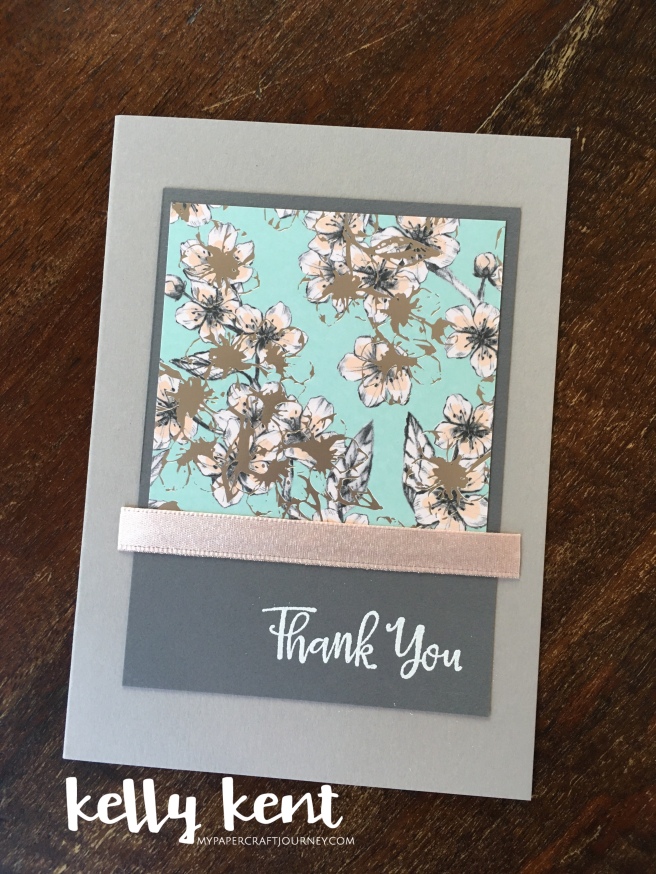
Today’s theme is ‘sympathy’.  Sympathy cards can be very hard to make.  The elements of the card – the colour choices, the theme, the stamps, the layout – it seems to carry more weight when the job of the card is to express to someone how much we care.  I wanted to make a card that covered feeling sad and the new Boho Indigo stamp has has the perfect sentiment – “sorry you’re feeling blue”.

I really love the Boho Indigo Product Medley with it’s serene blue tones and beautiful imagery in the stamp & die set.

Boho Indigo | kelly kent

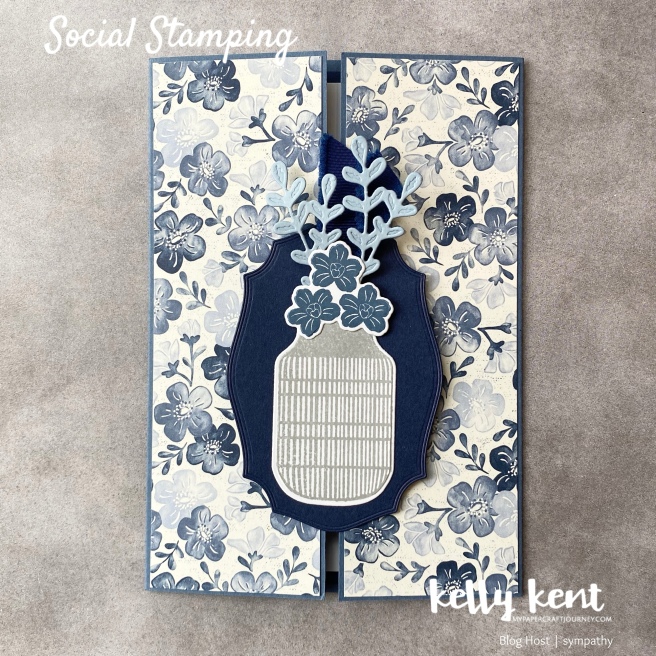
Flowers are a great way to express condolences and a good theme for sympathy cards.  The stamps and dies in this project set make it easy to create visually stunning arrangements in no time at all. I’ve used a combination of the vase (Smoky Slate), flowers (Misty Moonlight) and leaves (Seaside Spray).

I came across this style of card on Debbie Henderson’s blog recently.  She called it an interlocking card – and I just love it!!!

Boho Indigo | kelly kent

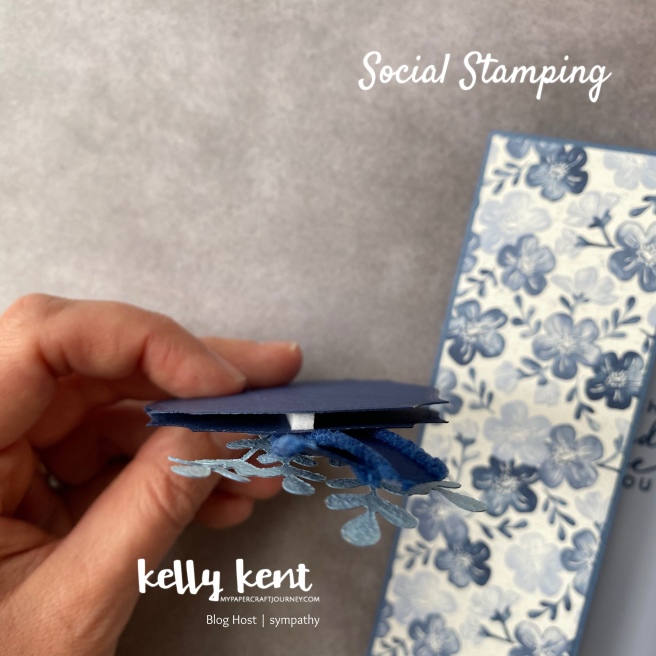
The finished card is the same size as a standard Australian card (A6) and fits in a normal C6 envelope.  To create the gap needed for the slider, you cut the card front down by 1/8″ to allow for the slider mechanism to sit snugly down the gap.  The card base is 8-1/8″ x 5-7/8″, scored at 2″ from each end.

Boho Indigo | kelly kent

The slider is made using two labels or tags held together with Foam Adhesive Strip.  I used two of the same size die from the Tasteful Labels set, cut from Misty Moonlight cardstock and held together using a piece of Foam Adhesive Strip.

Boho Indigo | kelly kent

It’s so simple but so clever – my favourite kind of card!  I can see this being my new favourite as it will fit any style or theme of card.

I’ve added the flowers & vase to the slider and also a piece of ribbon to act as a pull tab.

Boho Indigo | kelly kent

Thanks for hopping with us today.  Next blog to visit is by Julia Quinn – who makes gorgeous projects in sunny Queensland.

Enjoy your weekend.  I hope you don’t have a need for many sympathy cards, but if you do, I hope this hop has provided some helpful inspiration!

kelly kent | mypapercraftjourney.com

One Sheet Wonder Template | 6″ x 6″

Since the introduce of social distancing, our Paper Adventures Team has switched our team meetings to Zoom.  Team members have prepped a project set and completed it in the comfort of their craft room while chatting with others on Zoom.  The first meeting we used the Double Wonder One Sheet Wonder template. Click here to see the cards I made.

Last night’s meeting we chose templates for One Sheet Wonders using 6″ x 6″ DSP.  As always, the team made some amazing cards!  Having had the benefit of using templates by others, I thought I’d create one for this project to share.

6x6 One Sheet Wonder | kelly kent

This template make 4 cards in portrait orientation, but you could definitely alter the template to create them in landscape, or a mix of both.  If you use two 6″ x 6″ pieces of DSP, then you’ll be able to mix & match the pieces and create 8 cards with a variety of patterns.  Your creativity knows no limits!!!

You will need:

  • 1 x 6″x6″ DSP
  • 2 x sheets A4 cardstock cut & scored in half to make 4 card bases
  • 1 x sheet A4 cardstock for DSP mats (approx 7″ x 8-1/4″ – you can also use scraps)

Here’s the cutting template for the DSP

6x6 One Sheet Wonder | kelly kent

Cut the DSP into 3 segments by cutting the first panel at 1-1/2″, then the second panel at 3″ (leaving a third panel at 1-1/2″).  Then cut the first panel at 5-7/8″ to create a long strip for card A, the middle panel into one 3″ segment to get a 3″ x 3″ square for card B and then three 1″ strips for card C and finally, cut the end segment into 1-1/2″ squares for card D.

Card Mats:

Card A                   1-5/8″ x 5-7/8″

Card B                   3-1/4″ x 4-1/2″

Card C                   3-1/4″ x 3-3/6″

Card D                   3-3/6″ x 3-3/6″

Here’s a close up of each card for the Parisian Blossoms DSP –

One 6" Sheet Wonder | kelly kent
One 6″ Sheet Wonder | CARD A
One 6" Sheet Wonder | kelly kent
One 6″ Sheet Wonder | CARD B
One 6" Sheet Wonder | kelly kent
One 6″ Sheet Wonder | CARD C
One 6" Sheet Wonder | kelly kent
One 6″ Sheet Wonder | CARD D

The colours for this set are Gray Granite for the card bases, Basic Gray for the card mats and Petal Pink for the sentiment labels.    I’ve embellished with a touch of retired Powder Pink ribbon, stamps from the Peaceful Moments stamp set and Stitched So Sweetly Dies. The sentiments are heat embossed in white & black.

Like all the One Sheet Wonder templates I’ve used, I found this fun to create pretty cards with minimal fuss (or time!).  This template works well for a DSP with an intricate pattern, so you can let the detail in the DSP stand out as an artwork.  Or use a less detailed DSP and add your own embellishments!

Here’s another set I created using the Lily Impressions DSP.  This pattern from the pack was my favourite!  The colours for this set are Whisper White for the card bases, Blackberry Bliss for the card mats and Coastal Cabana for the sentiment label.  The stamp set is Peaceful Moments in Blackberry Bliss ink or white heat embossing.

One 6" Sheet Wonder | kelly kent

I’d love to see your creations with this template!

Happy stamping!

Social Stamping | hello from kelly

Hi there and thanks for stopping by my project for the first Social Stamping blog host.  I organised this during week as an opportunity to connect us during this crazy time – either by joining the blog host as a designer, or by visiting the blogs as a crafter.  You can see the master list of participants and a bit of background about the blog host in this post (click here).


With a little bit of extra time on my hands, this was my chance to put into action a project I’ve been thinking about for a while – a card with a light circuit.  You can buy LED kits but they are quite expensive.  Being a girl who is good with maths & science, I decided that if I had all the pieces, I could probably do it myself.  As it turns out, I can and I did!

DIY LED Circuit Card | kelly kent

The little light between the lantern and the tree branch lights up when you press the heart.

DIY LED Circuit Card | kelly kent

How cool is that???  I started with a piece of Whisper White cardstock 3-5/8″ x 5-3/8″ and a piece of copy paper the same size.  From the copy paper I cut out a 2-5/8″ circle and used this as a mask over the Whisper White to blend three tones of pink into a circle “moon”.  Blushing Bride, Rococo Rose & Melon Mambo.  To see more about ink blending, visit this blog post I wrote in Feb.

DIY LED Circuit Card | kelly kent

I then added a branch from the Seasonal Layers Dies in Soft Suede cardstock, watercoloured lantern on Shimmery White cardstock from the Power of Hope stamp set (available as a Sale-A-Bration reward until 31st March 2020) and ‘hello’ sentiment from the Free As A Bird stamp set in white embossing powder on Rococo Rose cardstock.  The heart (from the Be Mine Stitched Dies in Melon Mambo cardstock) in the bottom right corner corresponds to the battery placement and is where the card recipient will press to close the circuit and make

Once all this was set up, I knew where I wanted the LED light to go and was able to punch a 1/8″ circle for the light to sit in.  And then it was time to create the behind the scenes magic.  To make the circuit you need to connect the LED diode to a battery, creating a circuit breaker so that it only turns on when you press.

Here’s what the circuit looks like on the back…

Here’s a quick look at the circuit breaker flap in motion…

Supplies you’ll need to make your own at home.  For suppliers, check ebay or your local electronics store.

  • LED diode (I used 3mm white but these come in pretty colours & different sizes too)
  • CR1225 3V button cell lithium battery
  • Conductive Adhesive Copper Foil Tape (I used 6mm)
  • Circuit breaker – I used a strip of copy paper 1″ x 2″ folded in half

DIY LED Circuit Card | kelly kent

To finish the card, I used Foam Adhesive Strips to attach the circuit layer to the Rococo Rose mat (3-7/8″ x 5-5/8″).  Using the foam strips gives the circuit breaker some space to lie slightly open, meaning the light only comes on when you press all the layers together.

The card base is Blushing Bride cardstock with a top fold and then Rococo Rose and Whisper White layers on the inside to add some weight.

DIY LED Circuit Card | kelly kent

Many thanks to Marine from Blue Marine Crafts for her excellent tutorial which got me started on being able to make my own circuits.  You can see her card & video by clicking here.

I can’t wait to send this card to someone – and it could be someone you know!  Leave a comment on this blog – I’ll choose a comment at random as the winner, who can select a friend or family member to receive this card in the mail and add a little light to their life.


There’s lots more craft inspiration as part of this blog host.  You can see all the participants via the main blog post (click here) or you can click through to the next blog by Denita Wright-Smee.

Thank you for hopping with us!

Using Vinyl with Stampin’ Up! Dies

We all use our dies to create fabulous creative items using cardstock & DSP, but did you know our dies cut through any medium of a similar thickness?

I love using them with vinyl to create fun gifts.

This mug was made using Self Adhesive Vinyl.  This is the type of vinyl you need for hard finishes like mugs, drink bottles, car stickers.

The dies are from the Large Letters Framelits and the leaves from Eclectic Layers.

Vinyl & Stampin' Up! | kelly kent

Self Adhesive Vinyl has a plastic backing.  The die will cut through both layers.  I use clear contact (like you use to cover school books) to apply to the surface of your project.  Adhere the clear contact on to the vinyl side of your die cut.  Remove the plastic backing and then apply to your project.  When in place, gently remove the contact.  The vinyl should remain in place.

It’s suggested you prepare the surface of your project by wiping it over with Isocol (rubbing alcohol).  This removes any surface dirt or grime and give the vinyl the best chance of sticking properly.

Most Self Adhesive Vinyls will withstand handwashing, but not the dishwasher.


My second project to share with you is a bag using the Large Letters & Detailed Dragonfly Thinlits in Heat Transfer Vinyl (HTV).

This is the type of vinyl you’d use for soft finishes – tshirts, bags, cushions.

Vinyl & Stampin' Up! | kelly kent

The professionals use a heat press to apply this type of vinyl.  With a little patience, you can apply at home with a good quality iron.  Put it on the hottest setting with no steam.  You need to place a lightweight cloth or piece of fabric over the vinyl when ironing.

Vinyl & Stampin' Up! | kelly kent

Heat Transfer VInyl has a plastic top sheet.  The die will cut through both layers – the plastic & the vinyl.  Place it plastic side up and iron/press.  When you’ve applied enough heat, the vinyl will be adhered to your fabric and you’ll be able to gently lift the plastic layer.


There are lots of places you can buy vinyl online, and lots of brands to choose from.  Be sure to buy the correct type of vinyl for your intended project.  They are not interchangable.

I know you’re going to love trying this out and getting more projects from all your dies!


Product List

Enjoy the Little Things Video In Life Video Blog Hop | June – Guest Designer

Hello!  It’s an early blog post today as I have the great pleasure of joining the Enjoy the Little Things in Life Design Team for their June video blog hop.

I’ve been doing a few videos lately as part of my Stamp In Confidence program (read about that here), but it’s still not natural for me to be organised enough to craft and video at the same time!!!

But life is all about challenges and extending ourselves, so I was delighted to say yes to a guest designer role with the Enjoy the Little Things DT.

The theme for this hop is 3D.  The design team has come up with some lovely creations, complete with tutorial videos to help you make your own versions.

I’m so much of a card girl, and don’t often make boxes, bags or other 3D items.

So, for today’s project, I’m combining the two – a card that features an interactive 3D component.

Interactive Puzzle Card | kelly kent

One of the new bundles in the 2018-2019 Annual Catalogue is the Love You to PIeces stamp set and coordinating Puzzle Pieces Thinlits.  Such a fun way to create cards for big & little people!

I’ve created a double layer frame for the puzzle to sit in, so once the puzzle is together, it fits snugly onto the card front and looks like it’s part of the card.

But, the pieces can be taken out, mixed up and put back together just like a regular puzzle.

Interactive Puzzle Card | kelly kent

I’ve used the new embossing mat with the puzzle thinlit to create the background outline to guide the puzzle doer.

There’s so many pretty DSP patterns in the new catalogue that are perfect for this style of card.  This design is Petal Promenade – beautiful photography patterns of flowers on the main side & marble on the reverse.

Interactive Puzzle Card | kelly kent

Watch my tutorial video here to show you the steps for making your own interactive puzzle card.

Materials:

  • Card base: Thick Whisper White – 4-1/8″ x 11-11/16″ (10.5cm x 29.7cm), scored at 5-7/8″ (14.8cm)
  • Card mat: Blushing Bride – 3-7/8″ x 5-5/8″ (10cm x 14.3cm) x 2
  • DSP: Petal Promenade – 3-3/4″ x 3-3/4″ (9.7cm x 9.7cm)
  • Backing for DSP: Thick Very Vanilla – 3-3/4″ x 3-3/4″ (9.7cm x 9.7cm)
  • Multipurpose Adhesive Sheet – 3-3/4″ x 3-3/4″ (9.7cm x 9.7cm)
  • Mat for Puzzle inlay: Whisper White 3-3/4″ x 3-3/4″ (9.7cm x 9.7cm)
  • Scrap of Whisper White
  • Tranquil Tide Ink
  • Shimmer Ribbon – Powder Pink
  • Adhesive: Multipurpose Liquid Glue, Tear & Tape, Glue Dots
  • Big Shot & accessories (magnetic platform, cutting plates, embossing mat)

These puzzle cards were so much fun to make (and so easy), I made them in a couple of our other awesome DSP patterns too.

Animal Expedition

Interactive Puzzle Card | kelly kent

Twinkle Twinkle

Interactive Puzzle Card | kelly kent

All of these DSPs plus 7 of their friends are available in July as part of the Buy 3, get one free special.  It’s a great time to stock up!

Interactive Puzzle Card | kelly kent

Thanks for joining me today – and thanks for the Enjoy the Little Things DT for having me as a guest designer.

There’s a list of amazing designers taking part in the this video hop.  Click on the cute little blue frog to bring up the list and choose someone else to visit.

To hop in order, you’ll next visit the gorgeous Kim Oliver – click here to see what she’s made.

kelly kent | mypapercraftjourney.com


Product List – Petal Promenade

Product List – Extra supplies for alternative designs

Stamp Review Crew | Animal Outing

Hello!  It’s a wonderful Stamp Review Crew Hop today -my international Stampin’ Up! friends and I are sharing projects made using Animal Outing.  You’re going to love this hop!!!

This stamp set is part of a bundle with the Animal Friends Thinlits.  It’s also part of a suite with Animal Expedition DSP & other coordinating products.  See the range in the catalogue – page 27, or browse online.

I’m sharing two projects today made with the Animal Outing stamp set.

The first was a team class project where I wanted to share reverse image stamping with my team.

Animal Outing | kelly kent

The giraffe (and all the animals in in set) are perfect for this technique.  It adds extra dimension to the layout of a card – and means you can have animal friends looking at each other.

Animal Outing | kelly kent

There’s 4 giraffes in the circle – two facing left and two facing right (although one is upside down, so technically three of them are looking right!).  The ones facing right were stamped as normal.  The ones facing left were stamped onto a silicone mat and then transferred onto the cardstock.

Reverse Image Stamping | kelly kent

I’ve tried this technique before with Window Sheet – but you have to be so careful not to smudge the image as you transfer it.  Using the silicone sheet gives a much better image, but you can’t see through for placement – so it’s slightly trickier in that way.  I recommend doing the reverse image first, then lining up your other images.

Animal Outing | kelly kent

Although I love the sentiments in the stamp set, the animals go so well with lots of other sentiments. For my quartet of giraffes, I liked the ‘from all of us’ saying from the Itty Bitty Greetings stamp set.


For my second card, I wanted to stamp the rhino onto DSP to see the effect.  I love the Animal Expedition DSP (I’ve used that for the gray panel) but had a pink rhino in my head, so went looking through the new DSP – and fell in love with the Tropical Escape DSP Stack.  Oh my, the patterns in this are amazing!!!

Animal Outing | kelly kent

Add some embellishments and we have a cute & girly card.  I like the pink rhino – she’s fun!!!

Animal Outing | kelly kent

In both cards I’ve used Stampin’ Write Markers to add open eyes to the animals.  I still need some practice, but I like the effect of the animals looking out from the card.

Animal Outing | kelly kent

Thanks for joining us today for the Stamp Review Crew Animal Outing hop.

Next up is Linda Callahan and her super sweet project –

kelly kent | mypapercraftjourney.com


Product List – Giraffe

Product List – Rhino

Colour INKspiration #28

Who loves colour challenges???

You do!  We are amazed and humbled that so many lovely crafters choose to join in with our challenges each fortnight (or 3 weeks on those long months!).  Join us on Facebook to share your creation.  Click here to visit.

Each challenge has a top 5 voted by the design crew and then a winner as voted by the group.  The winner is invited to hop as a guest designer with us for a future hop (if they want to).

This challenge – #28 – has a special prize for a first-time entrant. All you have to do is comment that it is your first time entering and you will go into the draw to win registration to our new Stamp In Confidence program.  The winner will receive free registration for ‘Module One – Stamping Basics’. If you haven’t visited our new blog, you can find all the details about our new online class modules at https://stampinconfidence.blogspot.com.au/.

The colours for this challenge are stunning with an awesome inspiration photo to get the creativity flowing – do I say this every week???

No automatic alt text available.

Three sweet colours – Bermuda Bay, Sweet Sugarplum & Lemon Lime Twist plus a solid neutral – Soft Suede.  You can add any other neutral or metallic to your project to complete your colour palette.  If you don’t have the exact Stampin’ Up! match, create with the closest you have.

My creation starts with a story…..

I have this amazing crafty friend.  She’ll play with any craft medium but sewing is where her passion & skill lies.  She makes the most amazing quilted artworks.  See some of her work on Instagram (click here).

We lives hours apart so don’t catch up as often as we’d like, but whenever she comes for a visit, she’s straight to my shelf of stamps checking out what’s new and suggesting all kind of crazy stamping combinations.  She sees the world in a totally different way to me – it’s wonderful!

She fell in love with the unicorn from the Magical Day stamp set and spent quite some time brainstorming a rainbow farting unicorn!

So, here you are Miss Caity…. this is your rainbow tooting unicorn…

Rainbow Unicorn | kelly kent

I used the baby wipe technique with the Star of Light swirl to create the ‘rainbow farts’.

Baby Wipe Technique | kelly kent

Making your own multi-coloured ink pad is a great way to get a variety of colour tones in your stamped image.

Rainbow Unicorn | kelly kent

And those unicorns – don’t they look happy with themselves!

Did you spy that they are facing different ways?  The unicorn at the top is stamped exactly from the stamp set.

The unicorn at the bottom is a mirror image created using the reflection technique.

Simply stamp your image onto Window Sheet (acetate) and then press onto your cardstock.  I used Basic Gray Archival Ink.

Reflection Technique - Unicorn | kelly kent

This will give you an outline, which I then followed using my Soft Suede Stampin’ Write Marker.  To get the same effect on your ‘right way’ unicorn, stamp off the unicorn several times, then stamp onto your carstock and trace using the marker.  Stamping at full strength will make the colour too dark to effectively trace over.

To cut out the reverse unicorn using the framelit, hold it against a window and line up on the ‘wrong side’.  Hold it in place with some washi tape while you run it through the Big Shot.  Or you could just fussy cut…… your call!

Using a Framelit with the Reflection Technique | kelly kent

PS….. I think our windows need a clean!

The unicorn comes up great – you can’t even tell it’s a reflection!

Use your Stampin’ Write Markers to colour the unicorn mane/tail.

Reflection Technique - Unicorn | kelly kent

I could have gone with any of the birthday (or other) sentiments in my stash, but I thought the ‘cue the confetti’ sentiment from the Picture Perfect Birthday stamp set was cute & cheeky for this card!

Rainbow Unicorn | kelly kent

Thanks for joining me for today’s Colour INKspiration blog hop.

For more great cards with this colour combination, please visit my gorgeous friend Nicole Wilson.  I was lucky enough to catch up with Nicole yesterday – always a face I’m happy to see!!!

kelly kent | mypapercraftjourney.com

Product List

Introducing… Stamp In Confidence

My gorgeous friend Lou & I have been working hard in 2018 to design a series of online class modules with unique content.

We wanted to provide an option for novice and developing stampers to build their skills and knowledge and therefore their confidence to create fabulous, unique cards.

I’ve lost count of the number of times I’ve seen people ask for advice in online groups, admit to trawling Pinterest, spending hours on YouTube….

We’ve designed a series of modules that include live-style videos (real-time, no editing), tutorials, written content and online support.

These modules will suit new stampers, stampers who aren’t happy with the quality of their projects, stampers looking to refine their technique and stampers who want to develop their skills but don’t have the option of attending classes.

Module One registration is open now with the content due for release Mid March.

Each module is only $6 (Australian currency, or your country’s equivalent via PayPal). The value for each module is exceptional!

You can find all the information on our new Stamp In Confidence blog – stampinconfidence.blogspot.com.au.

Thanks for your support.  These modules may not be for you, but we appreciate you spreading the word to someone you know who might enjoy them!

kelly kent | mypapercraftjourney.com

Stamping Sunday February Tutorial Bundle

Thank you to all my followers who purchased the January Tutorial Bundle.  It was filled with great tips for using Brushos as well as some fantastic projects featuring Brusho and Sale-A-Bration products.  If you missed it, you can find all the info here.

February has another great tutorial for you – designed exclusively for Stamping Sunday by the design team members.

February’s tutorial features {SIX} amazing tutorials by myself, Danielle Bennenk, Cheryll Miller, Denita Wright-Smee, Kim Oliver & Sara Levin.

The theme for February is Occasions Catalogue Kits and Petal Passion Suite.

I am so in love with the tutorials in this bundle – I can’t wait to try out the projects.  There’s full instructions and measurements for each project, so you’ll be able to whip them up in no time at all!!!

Order $50 of your favourite Stampin’ Up! products from me in February and the tutorial is yours for {FREE}.  I’ll email it to you once I’ve received confirmation of your order.

If you live outside of Australia or already have a demonstrator you purchase from, there’s great news – you can buy the tutorial via my PayPal store.  Please add a comment to specify which month tutorial you are buying.

Click on the graphics below to purchase in either Australia dollars, US dollars or Euros.

Thank you for your support of the Stamping Sunday Design Team.

All the contributing members have shared their talents with us, taking the time to write professional & amazing quality tutorials.  I am so grateful to be part of this great team of artists!

kelly kent | mypapercraftjourney.com


Play date with Brushos

Yesterday my gorgeous best friend, Cait, visited for the day.  She’s crazy talented with a sewing machine – see her work here – and loves all crafts.

Since we were on my turf (and I suck at sewing actual projects), we played with paper and watched tennis.

Ready to impress with cool new products, I pulled out the Brusho Crystal Color pots.

Have you seen Brushos before?  They are teeny tiny watercolour ink crystals that react with water to create intense colours & amazing patterns.

Stampin’ Up! is offering a pack of 5 colours – Brilliant Red, Gamboge (orange), Moss Green, Prussian Blue & Yellow.  See them in my online store here.

Watch the Stampin’ Up! video…

You can either mix thoroughly to get a vibrant solid colour or use water spray to spread the crystals and end up with colour separation & patterns.  They blend beautifully – and did I mention the colours???

No two projects will be the same and you’ll end up with a unique design every time.  They don’t actually have a mind of their own – it just seems that way!

There’s one thing I’ve learnt while playing with Brushos…..  they are highly addictive.

But they are also a product that’s different from other colouring mediums we’ve had at Stampin’ Up! before.  Practice makes “perfect”.  You need to get down & messy with Brusho to get a feel for how they work.

Browsing videos, blog posts and tutorials may help if you’re not sure where to start.  You can find the Stamping Sunday tutorial here – full of projects and tips for using Brushos as a beginner.

Today, Cait and I splashed around the water and made a heap of different Brusho samples.  Brusho Techniques | kelly kent

This is not a comprehensive list of what you can do with Brusho – just some ideas to get started.

If you’ve just got your Brushos, I suggest you cut up a piece of Shimmery White cardstock into tag size pieces and get playing.  Our tags measured 2″ x 3-7/8″ (5 x 9cm) – 12 per A4 page.

Shimmery White is durable enough to play but more economical than Watercolour Paper.  It also gives you a nice shimmer through your Brusho colour!!

Here’s each of the techniques in more detail…

Brusho - Baby Wipe | kelly kent

Brusho - Emboss Resist Ombre | kelly kent

Brusho - Emboss Resist | kelly kent

Brusho - Emboss Resist Painting | kelly kent

Brusho - Watercolor Background | kelly kent

Brusho - Custom Watercolor Background | kelly kent

Brusho - Marbled | kelly kent

Brusho - dry application | kelly kent

Quite a lot of the magic of Brusho is in the finished product – once the colour has settled, once it’s dry.  Sometimes you need to walk away and come back later to see the amazing!!!

If you haven’t yet purchased Brushos, you can buy them in my online store. 

Other supplies you may need…. 

Happy inky fun ahead for Brusho owners!
kelly kent | mypapercraftjourney.com